HTML (hypertext markup language) is the building block of the internet. It provides the structure of the webpage and is how you put the content (paragraphs, images, navigation bars) onto the website.
The web started out as a way of sharing text documents and HTML reflects this. What you end up with often looks like a Microsoft Word document. Later you can add other languages like CSS and JavaScript to add styles and interactivity to your webpage but if you just want to write some code and see it displayed in your browser then this is the tutorial for you. And it’s a pretty awesome feeling when it works.
Boilerplate

When you’re creating an HTML document you will start with what is called boilerplate code. This is a template that will provide you with the basic setup which will make HTML work in the browser. You can then add to this template to customize your page. Copy and paste the boilerplate code below into your text editor
<!DOCTYPE html>
<html lang="en">
<head>
  <title></title>
  <meta charset="UTF-8" />
  <meta name="viewport" content="width=device-    width,initial-scale=1" />
</head>
<body>
</body>
</html>
Tags
Before we get started a quick note on tags. HTML is made up of tags that you can recognize from the pointy brackets (<>). There are 2 types of tags: regular and self-closing tags. A regular tag will start with an HTML tag eg <body>, which will then often contain some content, called children, before finishing with a closing tag, which will start with a “/” eg </body>. A self-closing tag will just contain one tag and will end with a “/” inside the brackets eg <meta charset="UTF-8" />
This is a regular tag
<p>text to be displayed</p>
This is a self closing tag
<img />
A closer look
Here we’ll have a closer look at what is in the boilerplate code. If that’s not for you and you want to jump into making stuff happen, then jump ahead to the next section.
let’s have a look at the code line by line and figure out what it’s doing
<!DOCTYPE html>
This tells the browser to expect an HTML document. It’s not an HTML tag but will give the browser information on how to handle our code.
<html lang="en">
Everything we write in HTML will be wrapped in an HTML tag. This is the opening tag and you will find the closing one at the end of the document.
<head>
Everything between the opening and closing head tags is not displayed on the page. This gives the browser extra information about our webpage and how to display it.
<title></title>
Text between these tags is the title of our webpage. Remember that information in the header is not displayed on the webpage. This won’t give you a heading on your webpage but will display the name of the page in the tab at the top of the browser.
<meta charset="UTF-8" />
charset stands for character set and has to do with the way text characters are displayed. Not all languages can be displayed in all character sets. The computer needs to know how to display characters such as “збаша ሰላም”. UTF-8 is used because it’s has a universal character set which allows for writing in many different languages.
<meta name="viewport" content="width=device-width,initial-scale=1" />
This tag is important for viewing content on mobile devices. It essentially tells the browser that the width of the screen should be the full width of the device. That saves you trying to navigate a website on your mobile where you have to scroll around from one side of the page to the other. Some of us who are old enough will remember this being standard in the bad old days of mobile internet.
</head>
<body>
</body>
</html>
Here we have the closing head and HTML tags that were opened earlier and between them is the body tag. This is where all the content that makes up your website goes. To find out some of the things you can put between those body tags keep on reading.
Adding your content

So you’ve got your boilerplate code. What are you going to do now? The first thing to do is to save your file and make a note of where you saved it. You might want to create a folder called website-projects and save it into “my documents” or on your desktop. The main webpage file is often called index.html, although you can name it whatever you want. just make sure it ends with .html. When you’ve done that, find the file you’ve just saved and double-click it. It will then open in your browser
Heading
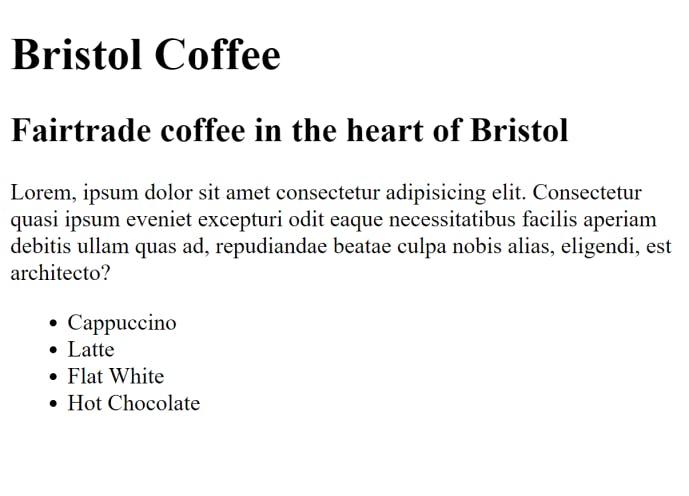
Let’s start by adding a heading to the webpage. In between the opening and closing <body> tags add a <h1> tag, then write your header and close the tag </h1>. Click save, open your webpage, hit refresh and take a look. Congrats 🎉 you’ve added some content! If you’re having trouble it should look something like this
<body>
  <h1>Bristol Coffee</h1>
</body>
Subtitle
Now let’s create a subtitle. We can use the <h2></h2> tags for this. Just add your subtitle between the tags as you did with the heading.
Paragraph
Next, let’s add some text. Below your heading, we’ll add a paragraph tag <p></p> and write some text between the tags. Have another look at the webpage (don’t forget to hit refresh). It should be starting to come together now.
Lists
The last thing we’ll put on this webpage is a list. There are 2 types of lists in HTML, an ordered and an unordered list. Ordered lists display numbered bullet points and unordered lists contain regular bullet points. Have a play around with both of them. In order to create an ordered list you will use the <ol></ol> tags and for an unordered list it’s <ul></ul>. Inside the list element, you will need to create a list item element with the <li></li> tags and have your content inside those. It will look something like this
<ul>
  <li>Wash the car</li>
  <li>Feed the dog</li>
  <li>do the shopping</li>
</ul>
Title
Finally, let’s change the title. Navigate to the <title></title> tags in the head section and write your website title in between the two tags. It should look something like this: <title>Bristol Coffee</title>. Your webpage title will now be displayed in your tab at the top of the page.
Putting it all together
Once you’ve put it all together it should look something like this.
<!DOCTYPE html>
<html lang="en">
  <head>
    <title>Bristol Coffee</title>
    <meta charset="UTF-8" />
    <meta name="viewport" content="width=device-width,initial-scale=1" />
  </head>
  <body>
    <h1>Bristol Coffee</h1>
    <h2>Fairtrade coffee in the heart of Bristol</h2>
    <p>
      Lorem, ipsum dolor sit amet consectetur adipisicing elit. Consectetur
      quasi ipsum eveniet excepturi odit eaque necessitatibus facilis aperiam
      debitis ullam quas ad, repudiandae beatae culpa nobis alias, eligendi, est
      architecto?
    </p>
    <ul>
        <li>Cappuccino</li>
        <li>Latte</li>
        <li>Flat White</li>
        <li>Hot Chocolate</li>
    </ul>
  </body>
</html>
Congratulations you’ve created your first HTML webpage. The best way to learn is by practicing so mix up these different elements and try to create something new. If you get stuck why not send me a tweet and I’ll see if I can help @john_palmgren
